It seems like whenever you get into a good routine, something changes. Most recently, it seems to be Daylight Savings Time. Whether your main problem is that the sun rises too early in the morning, shines too brightly throughout the day or stays in the sky too late in the evening, the bottom line remains the same: Nature won’t alter its patterns based on what’s going on in your nursery.
But you shouldn’t have to base your baby’s sleep patterns around the time change, either. And with a simple blackout curtain for your nursery, your child’s sleep schedule falls back under your control (relatively speaking, of course!) in no time.
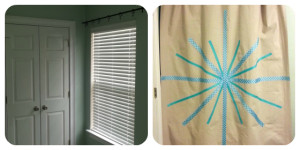
Here’s the window that I needed to cover…and I’m hoping this room will become the nursery…yes, dear husband, that not so subtle hint is for you!
DIY Blackout Curtains, Step 1
I started by hanging a drapery rod and attaching curtain rings with clips. This way, you don’t have to worry about creating a pocket in your fabric for the rod or installing grommets; you simply attach the curtain by the clips and you’re done.
DIY Blackout Curtains, Step 2
Next, I gathered the rest of my materials. I used a canvas drop cloth (6′ x 9′) from Home Depot and from my local fabric store, a 2-yard cut of blackout liner and several spools of ribbons.
As an added bonus, by using a white blackout liner, you can have more energy efficient windows (the light color helps to reflect the heat in the summer and the fabric itself adds insulation in the winter) while you develop a more efficient sleep routine with your child.
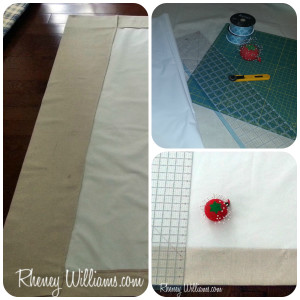 In order to keep this sewn curtain as simple as possible, I went with the pre-cut painter’s drop cloth. This technique also worked well for me due to the size of the casement window I covered; if you are going with purchased fabric, be sure to get between 1 ½ – 2 times the width of your window (double that if creating two separate panels). In terms of the blackout liner, it simply needs to cover the window opening plus a few inches all the way around.
DIY Blackout Curtains, Step 3
Begin by placing your fabric face down on a flat surface and position your blackout liner face up (lighter side facing you) on the fabric.
For the hemmed edges, start with the sides and fold the fabric over twice (so that you cover at least ½” of the blackout liner and can sandwich it between the fabric and the fold) and stitch close to the folded edge.
Repeat the process for the top hem. Before moving on to the bottom hem, hang your curtain exactly as you will hang it when completed to get the proper length. I wanted mine to stop about 1 inch from the ground so that it appears to graze the floor (creating length to the entire room and the window) but won’t interfere with my vacuuming!
Place pins where you want yours to end, remove the curtain and hem the bottom according to your marks.
You’ll also notice that my bottom hem is wider than the top and the sides (the photo shows the bottom edge on the left side). This helps to weigh down the curtain as it hangs and creates a more refined and finished look to the panel.
DIY Blackout Curtains, Step 4
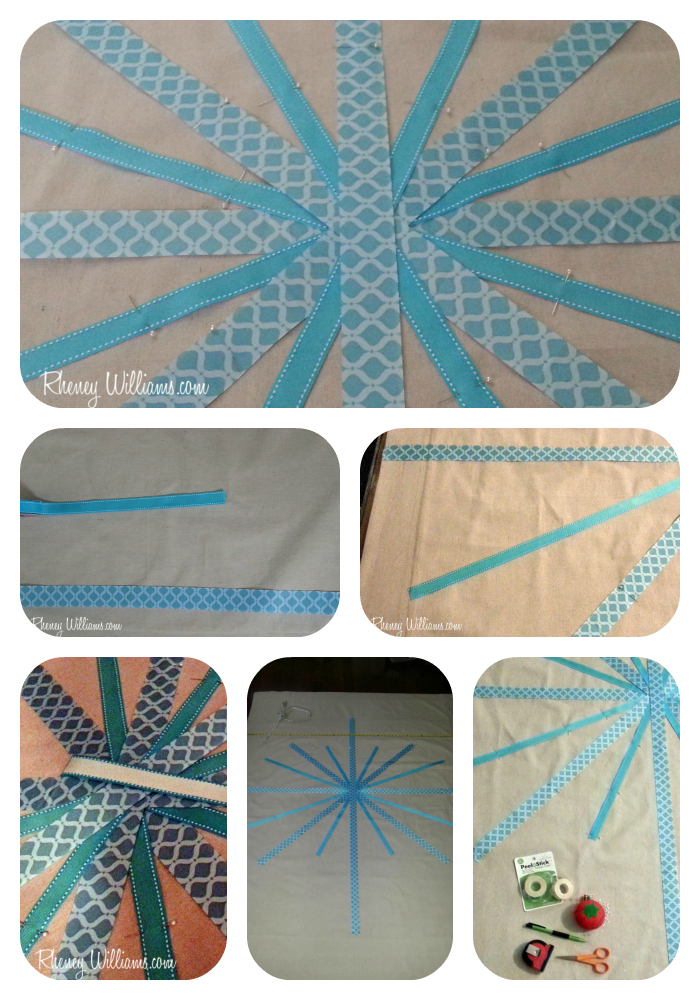 From here, I selected two different ribbons in complementary shades of aqua/turquoise blue (the 1 ½” ribbon has a lighter blue pattern and the ¾” ribbon has white stitching along the edges) and both with a slightly reflective sheen.
I wanted to create a star pattern (since we’re creating an artificial ‘nighttime’ nursery!) so I centered each ribbon accordingly. You can see what the ribbons look like when meticulously (and I mean that…since I created this design on the spot, this part took the longest) pinned into place.
DIY Blackout Curtains, Step 5
Rather than subject my little Brother sewing machine to the bulk of the finished curtain, I attached the ribbons using self-adhesive Peel-n-Stick tape – no sewing required!
I started by marking little pencil lines just underneath the ribbon near the edge about every 6″ or so for placement (the ribbon will cover the marks).
Remove the pins and pull the ribbon back from the fabric so that you can attach the sticky side of the roll of tape to the backside of the ribbon. Cut the roll at the end of the ribbon and carefully remove the paper backing.
 Using the pencil lines as a guide, smooth the now sticky ribbon back into place and press it firmly into the fabric. Continue all the way around the star.
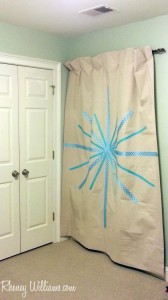
You’ve Finished Your Blackout Curtains!
Now you’re ready to hang! I formed pinch pleats by doing just that: I pinched the back of the curtain and clipped the pinch to create sweet little pleats.
And you’d never know it was daylight outside! Neither will your baby as you set up the sleep schedule that reconciles nature and nurture by covering your windows in a way that works for you.
What materials, colors and designs are you going to use in your own nursery blackout curtains?
Rheney Williams is a crafter in Charleston, S.C., where she writes about her window craft projects for The Home Depot. Rheney enjoys sharing her DIY crafting plans for her new home, which she is updating with all manner of custom Lowcountry touches. To visit Home Depot’s windows page, click here.